Inventory is a feature in QuickBooks that allows you to keep track of all of the products or services that your company has on hand. This category includes raw materials, finished goods, and services. This feature allows you to keep track of the number of items in stock, the cost of each item, and the total value of your inventory. This data can be used to generate reports and help you manage your business more effectively. This blog will provide you with the steps to learn How to Add Inventory in QuickBooks Online and Desktop. But first, know the benefits of adding an inventory.
What benefits of Adding an Inventory in QuickBooks?
Before proceeding to how to add inventory in QuickBooks, let’s go through the benefits of it:
- Greater accuracy: With a QuickBooks inventory system, users can track inventory more accurately and in real-time, ensuring that their books are always up to date.
- Easier cost tracking: QuickBooks’ inventory system allows users to track the cost of goods sold and goods on hand. This makes tracking inventory expenses easier.
- Easier forecasting: Users can more easily forecast future inventory needs based on previous sales trends.
- Increased efficiency: By automating inventory tracking and reporting, an inventory system in QuickBooks can save time and money. This enables users to concentrate on other aspects of their business.
After knowing about the benefits of adding the inventory in QuickBooks, let’s set or add it in the Desktop and Online versions.
Also, read : quickbooks downloads
How to Add Inventory in QuickBooks Desktop?
Adding the inventory in the QuickBooks Desktop is easy, but first, you must set it up and then add it. Follow the given steps and perform the inventory setup in QuickBooks:
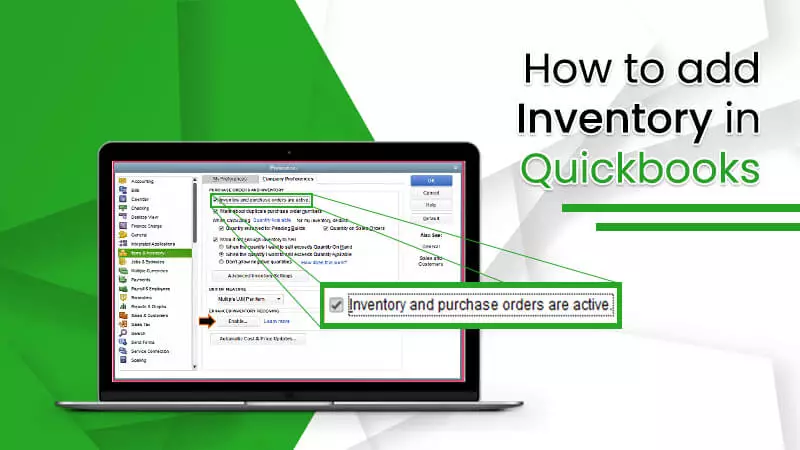
Step 1: Setup Inventory in QuickBooks
- Firstly, open QuickBooks.
- Secondly, go to the Edit
- Then, click on Preferences and then Items & Inventory.
- After that, click on Company Preferences.
- Now, checkmark the Inventory and Purchase Orders are Active
- Lastly, click on OK.
After setting up, now proceed to add the inventory.
Step 2: How to Add Inventory in QuickBooks Desktop
- First, from the Lists tab, you have to choose Items.
- Then, from the Items, choose New.
- After that, from the Type window drop-down, choose Inventory Par
- Now, enter the item’s name in the Item Name/Number
- In the next step, choose an Income Account for your sales
- Now, in the ON Hand field, enter the quantity.
- Also, complete other fields and then click on OK.
After knowing about how to add inventory in QuickBooks, if you want to turn on the Advanced Inventory, then follow the given steps:
Add Advanced Inventory in QuickBooks
- Firstly, go to the Edit menu and then choose Preferences.
- Now, choose Items & Inventory and go to the Company Preferences
- After that, choose the Inventory and Purchase Orders checkbox and ensure that they have an Active Status.
- In the next step, choose Advanced Inventory Setting If you cannot set the feature as active, you have to sync your license data online to be recognized by QuickBooks.
- Go to the Help and then Manage My License.
- Then, choose Sync License Data Online.
- After that, the Advanced Inventory Settings will not be inactive.
After adding the inventory to QuickBooks Desktop, let’s add it to QuickBooks Online.
Also, read : quickbooks desktop to online
How to Add Inventory in QuickBooks Online?
Step 1: Enable inventory tracking.
Turn on these settings if you haven’t already so you can add your inventory.
- Select Company settings from the Settings
- Choose Sale
- In the Products and services section, click Edit.
- On sales forms, enable the Show Product/Service Column
- Track quantity and price/rate, and also the inventory quantity on hand must be
- Choose Save and then Done.
Step 2: How to Add Inventory in QuickBooks Online
You can now enter your inventory items, as well as other products and services, into QuickBooks. This lets you quickly include them as line items on your sales forms. The steps for adding inventory, non-inventory, and service items differ slightly:
- Firstly, select Products and services from the Get paid & pay
- Secondly, to add a product or service, click Then choose Inventory.
- After that, enter a Name* and SKU for the item you’re tracking.
- Lastly, choose a category from the Category drop-down.
Tip: Use categories to organize your products and services, making them easier to find.
Step 3: Enter The Quantity, Reorder Point, And Inventory Asset Account For Your Product
Here you have to enter the reorder point, inventory asset, and quantity of the product to know how to add inventory in QuickBooks. The following are the steps:
- Add the initial quantity on hand for your product. Then, in the As of the date field, enter the date you began tracking that quantity.
Note: If you’re new to QuickBooks, the initial quantity is determined by the date you intend to begin tracking your business. For example, if you plan to begin tracking at the start of your fiscal year, enter the quantities of your products at that time. If adding a new vendor’s product, you have to enter “0” as its initial quantity. After that, keep track of how many of these products you receive from vendors. This prevents you from doubling the original amount.
- Add a Reorder point to receive notifications when it’s time to reorder. It is the third rectangular shape you see.
- Select Inventory Asset from the Inventory asset account drop-down. QuickBooks uses this account to keep track of the costs of all the products you keep on hand (or inventory value).
After entering the quantity, now enter the sales and other items to completely know how to add inventory in QuickBooks with the following step:
Step 4: Enter The Sales, Tax, And Purchasing Information For Your Product.
- First, on sales forms, include a description of your product. This appears on invoices, sales receipts, and other custom forms.
- Then, add the Unit Cost.
- After that, include the Sales Price/Rate.
- Find the account you use to track what you sell in the Income account drop-down menu.
Tip: Use an income account that QuickBooks has already set up for you. If you need to create a new account, scroll to the top of the drop-down list and choose + Add new. Alternatively, learn more about the chart of accounts for how to add inventory in QuickBooks entirely.
- Now, if applicable, check the Include Tax check box.
- Choose a Sales Tax Category from the drop-down menu and specify how the item should be taxed. Set up sales tax in QuickBooks if you don’t see this drop-down.
- In the next step, on purchase forms, Include A Description of your product. This will appear on bills, purchase orders, and other vendor forms.
- Add the Cost of The Product. Don’t be concerned if this changes. When purchasing supplies, you can still enter the updated price.
- Select Cost of Goods Sold from the Expense Account drop-down menu. This account is used by QuickBooks to track the cost of the products you sell.
- If applicable, check the Inclusive Of Purchase Tax check box.
- Select Applicable Purchase Tax from the drop-down menu.
- The reverse charge should be added.
- Choose a Preferred Vendor. QuickBooks remembers your preferred vendor, allowing you to easily reorder this product.
- Choose Advanced Options.
- Enter the SKU or Category for the item you’re tracking. Tip: Use categories to organize your products and services so they’re easier to find.
- Choose Save and Close.
Need Assistance
Now, you know how to add inventory in QuickBooks Online, and Desktop is quick and easy. After setting up the inventory item, you can track the quantity in stock, the cost of the item, and any other information related to the item. Except for specialized inventory items, you can manage most of your inventory from the same screen. However, if you face any issues in adding the inventory to QuickBooks, then our ProAdvisors are still there, contact them and get your issue resolved.
Thank You!